
How to Make a Chipmunks Dance Video
The three dancers keep trading the front spot. That is the key to this Chipmunks Dance remake: each photo must follow a person through the turns, rather than stay attached to the left, middle or right of the screen.
Open Chipmunks Dance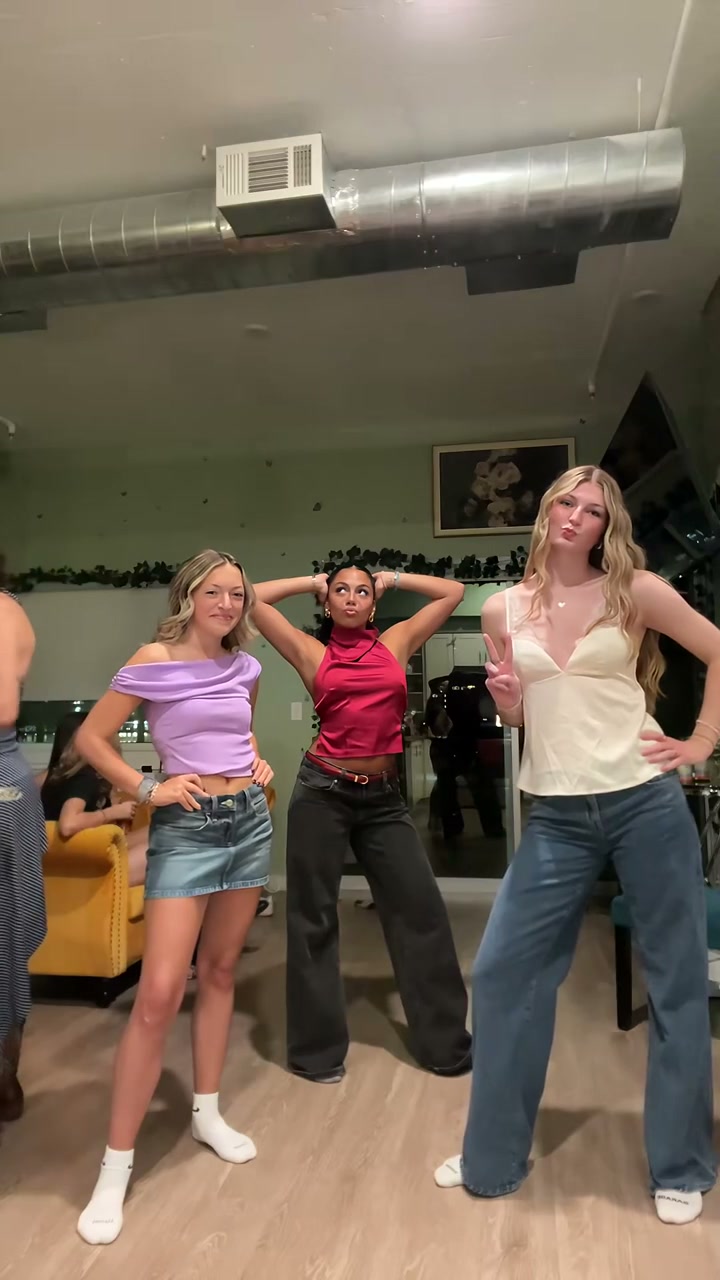
1. Prepare the reference video
Use the complete 25.6-second vertical reference below. It shows three active dancers, each taking a front position, with spectators in the background. The opening 14.9 seconds form a shorter first round; the full clip includes the later group movement and final approach. Keep the dancers’ feet and the room around them visible.
For persistent role confusion, prepare an edited opening frame containing all three chosen people in the source poses and positions. Supply it with the reference video in a compatible mode. Keep the original three portraits if additional image references are supported. This makes the starting cast explicit and adds an image step; skip it when the direct three-photo edit works.
An edited still must be supported by the selected video mode. Use the actual opening frame for a first-frame input; a timed keyframe stays at its source time. An ordinary image-to-video mode without the reference clip will not automatically reproduce this performance. This extra step may clarify the target appearance, but it adds work and does not guarantee better motion.
2. Prepare 3 separate character photos
Use Image 1 for the dancer who starts on the left in a purple top, Image 2 for the dancer starting in the middle behind the others in a red top, and Image 3 for the opening right dancer in a light top. These colors identify the source roles; your photos can use entirely different clothes. Choose separate full-body images and include shoes.
| Upload | Role in the opening | What the photo should show |
|---|---|---|
| Image 1 | Opening left dancer | The dancer starting on the left in a purple top. Use a separate full-body photo including shoes. |
| Image 2 | Opening middle dancer | The dancer starting behind the others in a red top. Keep one person and the intended outfit in this photo. |
| Image 3 | Opening right dancer | The dancer starting on the right in a light top. Show the face, whole body and footwear. |
Use the intended clothing in the same photo as each person. The reference supplies the setting and body movement, so a simple standing portrait is enough. A clear face and visible body are more useful than trying to imitate an exact pose with an obscured face.
3. Choose a video generation model
The reference has three moving subjects, crossing bodies and back turns. Use a video-editing mode with multiple image references, such as Kling 4.0 Omni Reference or Seedance 2.5 editing. Single-person motion control is not a like-for-like substitute for this trio. Keep the full scene rather than trying to make three independent solo videos and layer them together.
Use a mode that accepts the actual source clip together with all of your character images. Compare input support and the current quote before generating; the model name alone does not tell you which editing controls an interface exposes. For a fuller comparison, read our video model guide by scene and budget.
4. Prepare the prompt
Upload the clip as Video 1 and the 3 photos in the order above. Add the editor’s uploaded-asset references so the names in the prompt point to the correct files. This example uses Kling-style @Video1 and @Image1 tags; replace those tags with your chosen editor’s equivalents.
Edit @Video1 with @Image1 as the dancer who starts on the left, @Image2 as the dancer who starts in the middle behind the others, and @Image3 as the dancer who starts on the right. Reconstruct each dancer’s complete appearance, hairstyle, body, outfit and shoes from their assigned photo. Track each person continuously as they turn, cross positions and take turns approaching the camera; assignments refer to their opening positions, not their current screen positions. Preserve the arm movements, footwork, turns, shared rhythm and final approach. Keep the living room, camera, framing and background spectators unchanged. Exactly three active dancers; no animal transformation, extra dancers or added text.
If you use a different clip or a shorter selection, update the opening positions and remove actions that are no longer present. Keep the appearance assignments explicit instead of asking the editor to replace every person in the scene.
5. Generate the video and choose its sound
Use a 9:16 canvas and an available 720p or 1080p output. Keep the source duration when editing mode follows it automatically. If the interface requires whole seconds, allow 26 seconds and trim any surplus ending. Keep the original action speed so reactions and sound remain aligned.
To keep the reference soundtrack, use original-audio preservation if the mode supports it. Otherwise place the downloaded reference audio beneath the generated picture in an editor, mute generated sound and align the action. If the model changed the timing, align the affected movement as well as the opening; matching the start alone is not enough.
For a different sound treatment, select an audio-generating mode in Kling 4.0 or Seedance 2.5 and describe the desired sound. Enable its audio control if the interface provides one. You can add:
Audio: an original upbeat dance instrumental with a steady rhythm and light room ambience. No vocals or dialogue.
Newly generated sound is an alternative to the existing track. It does not copy a song or clone a person’s voice from their photo. Export the finished picture and chosen audio together as MP4.
Optional: edit a short passage without losing the cast
If one turn repeatedly changes a dancer’s identity, select a continuous passage that starts while all three roles are still clear and ends after that turn. Edit it with the same three photos, then replace that passage in your generated video. Write the role mapping for the opening of your selected passage: the person who started on the left of the full video may now be on the right. Keep a little overlap for choosing an unobtrusive join. Arbitrary cuts at the exact moment two dancers overlap are harder to match.
Use the prepared Chipmunks Dance template
The Chipmunks Dance template prepares the reference, role instructions and soundtrack. Upload 3 separate photos in the labeled slots, choose a mode and resolution, and review the credit quote. Sign in to generate; the result appears in My creations.
Original uses the complete 25.6-second reference. Economy and Standard use a 14.9-second selection starting at about 0 seconds, with a fifteen-second output setting. The fixed template does not ask you to upload a clip or paste the tutorial prompt.
Make my videoBefore you start
Does Chipmunks Dance turn people into cartoon animals?
This version recreates the human trio routine shown in the preview. Your three photos provide the characters’ appearances and clothes. It does not have a cartoon conversion setting or supply licensed character costumes.
Can I use one group photo for Chipmunks Dance?
This template requires three separate uploads. A group photo does not fill all three roles, and the model may not know which person belongs to each dancer. Crop or prepare a separate, clear photo for each person before starting.
Which dancer uses each photo?
Photo 1 starts on the left in the example, Photo 2 starts in the middle behind the others, and Photo 3 starts on the right. The assignments follow the individuals during Chipmunks Dance, even when their screen positions change.
Make the prepared scene with your cast
Bring 3 separate photos. The template handles the reference video, instructions and soundtrack.
Open Chipmunks Dance