
How to Make an End of Watch AI Video
A sideways glance, a prop held close to the lens, then the next reveal. The End of Watch scene works because of that familiar performance. Here’s how to keep its timing while giving the lead—and, optionally, the partner behind them—your chosen appearance.
Open End of Watch AI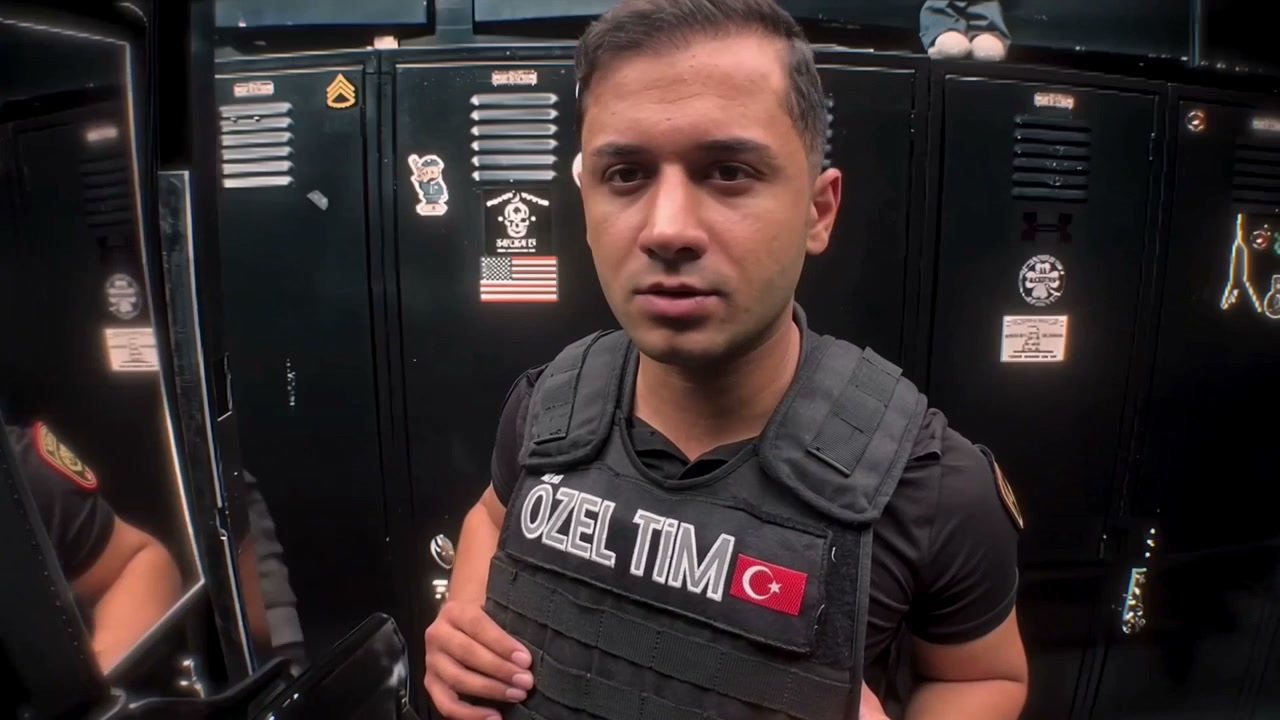
The scene behind the trend
The locker-room setup comes from End of Watch (2012), directed by David Ayer. Jake Gyllenhaal plays Brian Taylor, alongside Michael Peña as Mike Zavala. In the scene, Taylor records himself and his partner before their shift, then holds his equipment up to the camera.
That close-camera presentation gives a remake its recognizable rhythm: look toward the partner, return to the lens, bring an object forward. Your reference video carries those gestures; your photos define the people performing them.
The preview above is the community remake shown on the End of Watch AI tool page. This tutorial uses that downloadable example, with its foreground lead, rear partner and short prop sequence. The film source is linked below if you want to explore the original performance.
1. Prepare the reference video
This community remake is ready to upload as Video 1; no trimming is needed. Keep the full landscape frame so the close-camera lead, rear partner and prop reveals remain visible.
Want to use the movie scene instead?
You can view the locker-room scene at about 0:30. Around 0:30–0:46 in this upload, Taylor turns back toward the lens and presents his equipment. To use that roughly 16-second selection, trim a copy you have permission to edit, keep the landscape frame and export an MP4 with its sound. Follow your chosen clip’s duration and prop sequence when adapting the steps below.
2. Prepare your character photos
The lead repeatedly turns and brings objects across the lower face. Choose a sharp photo with the face, hair, shoulders and intended outfit visible. A chest-up or waist-up picture gives the model more clothing information than a tightly cropped selfie. You do not need to hold any props in the photo.
Image 1: foreground lead
One person, with an unobstructed face and the upper-body outfit you want in the result.
Image 2: optional rear partner
A separate photo for the person on the viewer’s left. Leave this out if you want to keep the existing partner.
Video 1: performance and setting
The downloaded example supplies the action, room and camera. Upload the full clip, with the rear partner still visible.
Use separate photos for separate roles. A group selfie leaves the assignment ambiguous. If a collar, jacket or hairstyle matters to the remake, make sure it is actually visible in that person’s reference; tiny badges and lettering may not reproduce exactly.
3. Choose a video generation model
Kling 4.0 and Seedance 2.5 are options for editing this scene with video and image references. Choose a mode that accepts the source clip together with character photos and lets you describe each role. For this two-person scene, prioritize control over the cast, room and props; single-person motion control has a different scope.
Keep the complete 11.2-second example for your first attempt. If you choose a simpler, single-person reference, Kling 2.6 or 3.0 Motion Control may also be suitable. Compare the input requirements and cost for your chosen clip in our video model comparison by scene and budget.
4. Prepare the prompt
Upload the downloaded example as Video 1 and the lead photo as Image 1. Insert the editor’s asset references so the labels in the prompt point to those files. The example below uses Kling-style @Video1 and @Image1 tags. In another model, use its asset references for the same files and keep the role instructions. Start with this prompt for the lead:
Edit @Video1. Recreate the foreground lead using the complete appearance of the person in @Image1, including their face, hairstyle, body and clothing. Follow the lead’s expressions, sideways glance, hand movements and prop presentation in the source video. Keep the rear partner as shown in the source. Preserve the locker room, camera position, lighting, sequence of objects and original timing. Keep the lead’s appearance consistent when hands or props pass in front of their face. Keep each object in the same hand and at the same point in the sequence. No subtitles or background music.
To cast the partner too, upload their separate photo as Image 2. Replace the sentence “Keep the rear partner as shown in the source” with the following instruction:
Use @Image2 for the rear partner, on the viewer’s left at the start. Carry that person’s complete appearance and clothing into this role. Keep @Image1 assigned to the foreground lead and @Image2 assigned to the rear partner throughout.
The prompt follows the downloaded example’s gestures and prop sequence. If you choose a different clip, check the opening positions and adjust the role descriptions to match it.
5. Generate your video and choose its sound
Use 16:9 and 720p or 1080p. Keep the source duration when the editor follows it automatically; if it asks for whole seconds, choose 12 seconds for the 11.2-second example and trim the extra ending. Keep the full prop sequence together.
For new sound, use an audio-generating mode in Kling 4.0 or Seedance 2.5 and describe the ambience, effects or dialogue you want. Audio controls depend on the mode; enable audio if your interface offers that option. For this scene, you can add the following to the editing prompt:
Audio: quiet locker-room ambience, clothing rustle and prop-handling sounds timed to the gestures. No dialogue or background music.
To keep the exact reference soundtrack, use a preserve-original-audio option where available. If the output changes or omits it, place the downloaded reference’s audio under the generated clip in an editor, mute the generated track and align the action before exporting. Newly generated sound will not be an exact copy of the reference.
Optional: replace the cast in a still first
If direct generation struggles to keep your characters or outfits consistent, try preparing one frame with the replacements already in place. This gives the video model a concrete picture of the intended result, reducing how much it has to work out from separate portraits. It can help with a demanding two-person edit; skip it when your chosen model already produces a good result.
Take a clear frame from the reference and give it, together with your character photos, to an image-editing model such as GPT Image 2.5. Replace the lead and, optionally, the partner; preserve their poses, positions, the room and props. Then upload the edited still with the reference video: the still supplies the intended appearance and layout, while the clip supplies the performance.
Use a mode that accepts both inputs. For a first-frame input, edit the clip’s actual opening frame; for a timed keyframe, keep its original time position. This adds one image-generation step and cannot guarantee better motion or fix every hand-and-prop interaction. See how keyframe editing differs from motion control.
Skip the setup with the prepared template
For the community version shown at the top, Motion Transfer’s End of Watch AI template already has the reference and role instructions prepared. Upload your photos directly; the template handles the video input, prompt setup and reference soundtrack.
1Upload your cast
Add the foreground lead photo. Add a separate Rear partner photo only if you want to personalize that role too.
2Check the quote and generate
Review the available output settings and the credit quote, sign in, and generate. You do not need to upload a video or write a prompt.
3Review and download
Open the finished clip in My creations and download the video with its reference soundtrack.
Before you make your version
Can I use a selfie, or do I need a full-body photo?
A clear selfie can provide facial detail, but include the shoulders and upper-body clothing if you want that outfit carried into the scene. The close-up performance makes a full-body photo less important than a readable face, hair and torso.
Can I make it with one photo?
Yes. Use one photo for the foreground lead and ask the model to preserve the rear partner. To personalize both roles, use two separate photos and assign each one explicitly. The Motion Transfer template has a required lead slot and an optional partner slot.
Why is the template shorter than the movie scene?
The downloadable example and template use a roughly 11-second community edit. The original movie scene contains a longer exchange and equipment presentation. You can follow this guide with the complete downloaded clip, or choose a different selection and adjust the duration to match.
Can I publish a remake with the movie audio?
The film footage and soundtrack have their own rights. A public video link or AI edit does not grant permission to reuse them. Use material you are permitted to publish; an original performance and your own audio give you a separate starting point.
Does each attempt use credits?
On Motion Transfer, generation requires an account and sufficient credits; review the current quote before each new attempt. Other model platforms set their own prices. Preparing the crop and role assignments first can help you avoid submitting a job with the wrong inputs.
Put your cast in the locker-room scene
The performance is ready. Bring one lead photo, optionally add your partner, and generate your version.
Open End of Watch AI