
How to Make a Birds of a Feather AI Chair Video
Leaning back in a chair, looking up into the lens, then stretching both arms out: the performance feels effortless, but the changing camera angles do much of the work. Use a reference clip to carry that movement and a full-body photo to give the performer your look.
Open Birds of a Feather AI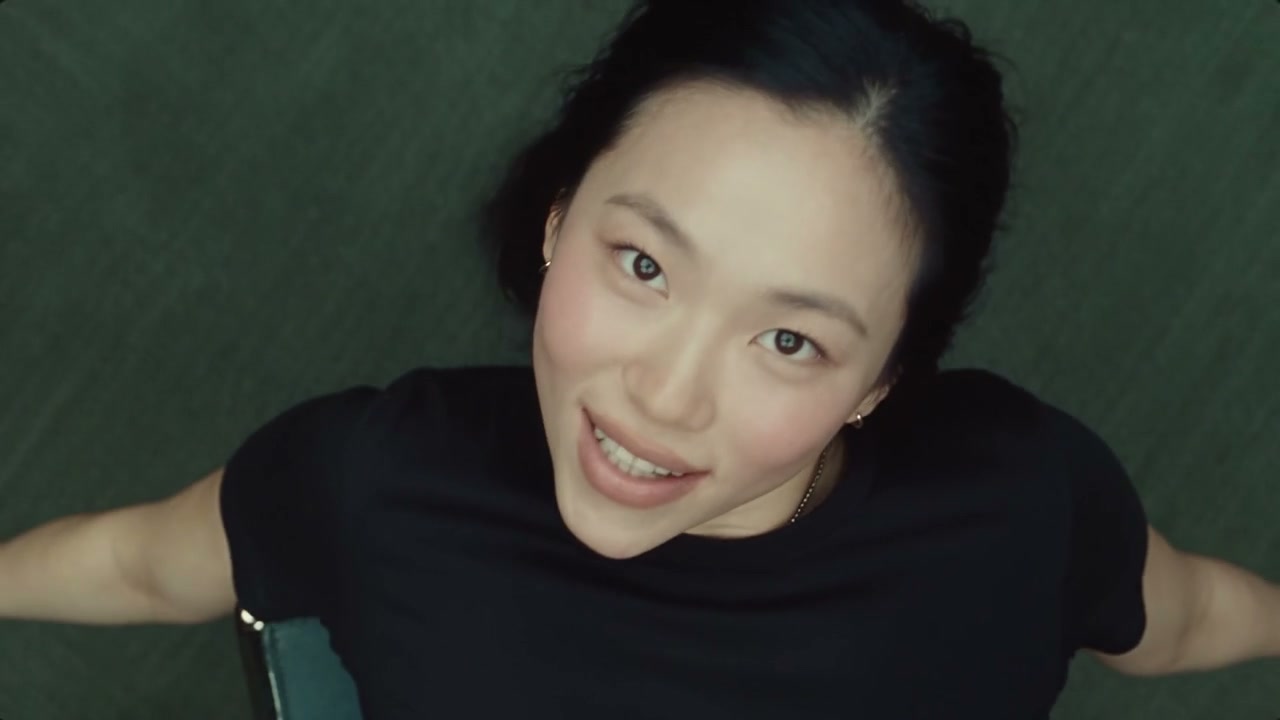
Which Birds of a Feather video are we making?
This guide covers the office-chair version shown above. The name refers to Billie Eilish’s song; you can watch the official BIRDS OF A FEATHER music video for the original music-video context. Our downloadable clip is the community remake displayed on the Motion Transfer tool page.
One performer reclines in a chair in a wood-paneled office. Overhead shots follow the face, hair and extended arms; brief low angles reveal the shoes and chair legs. Your edit needs to keep that same person and outfit across all of those views.
1. Prepare the reference video
Download this 19-second example and use the complete file for the tutorial. It includes the camera cuts and an audio track. Keep the landscape frame so the arms and chair remain visible; there is no need to trim it for a mode that accepts a 19-second editing input.
If you only want a short version, choose a complete gesture within one continuous overhead shot and cut at the existing shot boundaries. Avoid ending halfway through an arm extension. Save that selection with its matching audio, and use its shorter duration in the remaining steps.
2. Prepare a photo with your outfit and shoes
Choose a clear head-to-feet photo of one person wearing the complete outfit you want. Include both shoes and keep the face readable. A standing photo is fine: the source video supplies the seated pose, chair and room.
A cropped selfie leaves the model to invent the trousers and footwear that appear in the low shots. If you need to take a new picture, use even light and a simple background, with your arms slightly away from your torso so the sleeves and body shape are visible. You do not need a separate chair image or a second person.
3. Choose a video generation model
Kling 4.0 Omni Reference and Seedance 2.5 video editing can take a source video together with character images. Use their editing workflow for the complete 19-second sequence. This lets you ask for a new performer while retaining the chair, office, camera path and cuts.
One visible person does not make this a simple motion-transfer clip: the performer reclines, interacts with a chair and appears from sharply different viewpoints. For a simpler single-shot version, Kling 2.6 or 3.0 Motion Control may be an option when the person stays visible and the framing is steady. Compare that narrower workflow and its current cost in our video model selection guide; use video editing when keeping this exact scene is the goal.
4. Prepare the prompt
Upload the downloaded clip as Video 1 and your full-body photo as Image 1. Add the editor’s references to those uploaded files. The prompt below uses Kling-style tags; replace them with the equivalent asset references if you choose another model.
Edit @Video1. Replace the person in the chair with the person in @Image1, using their complete appearance, hairstyle, body, outfit and shoes. Keep the same person and clothing in every shot, including the overhead close-ups and low-angle views of the legs and feet. Follow the reference performance: reclining in the chair, head turns, facial expressions, lip movements and arm extensions at the original speed. Preserve the existing chair, its tilt and movement, the performer’s contact with the seat, the wood-paneled office, carpet and lighting. Preserve the camera movement, shot order, cuts and total duration. Keep one performer. No subtitles or added text.
Keeping the shoes in the instruction matters because some shots show very little of the face. For a trimmed single shot, remove references to camera cuts that are no longer in your selection.
5. Generate your video and choose its sound
Use 16:9 and an available 720p or 1080p output. Keep the 19-second source duration in editing mode, or enter 19 seconds if the interface asks. Preserve the action speed: slowing the chair movement changes how it fits the soundtrack.
For the familiar reference timing, retain the source audio when the mode supports it. If the output changes or omits that track, place the downloaded clip’s audio beneath the generated video in an editor, mute any generated audio and align the cuts. Export the combined video as MP4. Your character photo supplies appearance; it does not supply a new singing voice.
For an alternative version with fresh sound, use an audio-generating mode in Kling 4.0 or Seedance 2.5. Enable audio where the interface offers a control and describe your desired ambience or original music. For example, add:
Audio: a soft original instrumental pop backing with warm bass and light percussion, plus subtle clothing and chair sounds. No vocals or dialogue.
Newly generated music will not reproduce the song or its exact beat. Use the reference timing when the recognizable musical moment is your goal; use audio you are permitted to publish when sharing the result.
Optional: replace the performer in a frame first
If direct editing struggles with the reclining pose or keeps changing the outfit, give the video model a picture of the intended result. Extract a clear frame from the troublesome shot, then give that frame and your character photo to an image-editing model. Ask it to replace the performer while preserving the body pose, chair, framing and room.
Once the still has the right person, outfit and chair contact, supply it alongside that shot’s reference video in a compatible video-editing mode. The still shows how the replacement fits the scene; the video supplies the performance. For first-frame conditioning, edit the actual opening frame of your selected shot. A timed keyframe must stay at its original time position.
This extra image step can make the visual target clearer, but it adds work and cannot guarantee the movement. Skip it when direct editing already gives a good result. One overhead still also leaves the shoes largely unspecified, so retain the full-body photo as an additional appearance reference if the mode supports it. Read more about using an edited frame with a reference video.
Use the prepared chair-video template
To skip the video and prompt setup, open the Birds of a Feather AI template. Upload one photo to Chair performer. The template supplies the chair sequence and reference soundtrack; you choose the mode and available resolution, review the credit quote and generate after signing in.
Original uses the full 19-second reference. Economy and Standard use the prepared opening highlight of about 15 seconds. The mode sets the length, so there is no manual clip-selection step. The finished video is available in My creations.
Make my chair videoBefore you make your chair video
Do I need to be sitting down in my photo?
No. A standing head-to-feet photo gives the model information about your whole outfit and shoes. The reference video supplies the chair pose. If that pose is difficult to reconstruct, the optional edited-frame method gives it a more explicit visual starting point.
Can I make a two-person version?
This reference and the prepared template use one performer. Adding a group photo will not create a controlled duet. Choose a two-person reference and assign each person separately, or try the Alors on Danse tutorial linked below.
Can I post it as a vertical video?
Generate the complete 16:9 scene first. In your editor, fit it into a vertical canvas or adjust the crop for each shot. A single fixed center crop can cut off the outstretched arms and the chair; fitting the landscape video preserves them.
Bring your look to the chair performance
Choose a photo with your outfit and shoes. The prepared template supplies the scene, movement and reference sound.
Open Birds of a Feather AI